
- Golden Bugs Guide: Catch them All to Be the Belle of the Bug Ball - August 11, 2022
- Kaepora Gaebora Guide - June 11, 2022
- Darknut Guide - June 8, 2022
As you make your way through Legend of Zelda: Breath of the Wild, you’ll discover that there are a wide range of armor sets that Link can wear. There’s the Zora armor that gives Link better swimming abilities, the Ancient armor that protects Link against guardians, and the Sheikah armor that increases Link’s stealthiness.
Another popular armor set in Breath of the Wild is the Barbarian Armor, which increases Link’s attack power when he’s fighting enemies. The pieces to this armor are found in labyrinths spread across Hyrule. One piece, in particular, is located in the South Lomei Labyrinth, which we’re going to tell you all about.
Key Details Up Front
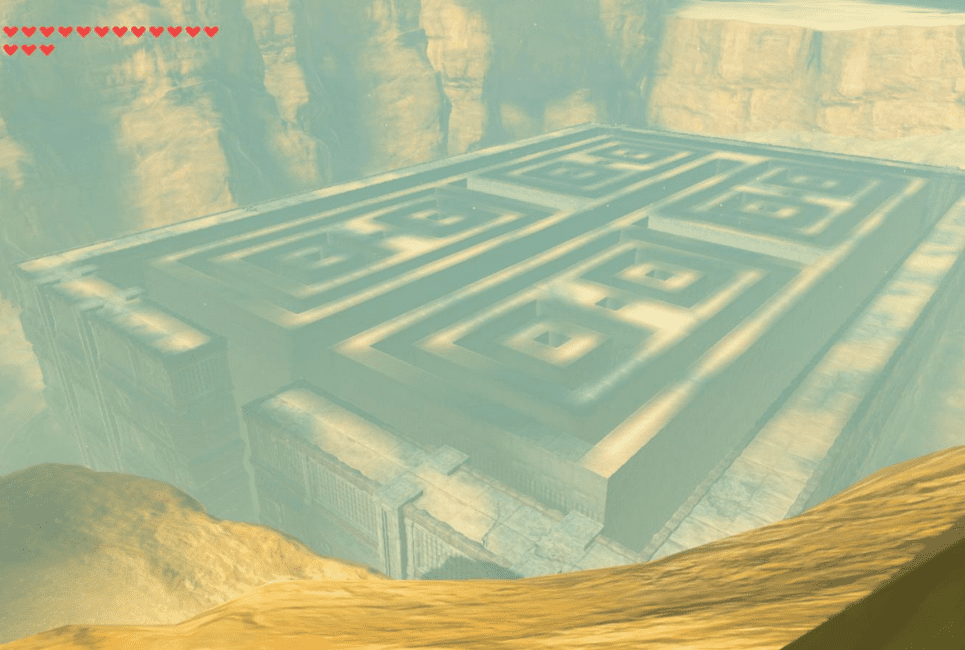
South Lomei Labyrinth is one of three mazes located throughout Hyrule in Legend of Zelda: Breath of the Wild. If you know where to go, completing the labyrinth and locating the shrine doesn’t take long. Plus, once you have access to the Dila Maag shrine, you’re rewarded with the Barbarian Armor chest piece.

How to Get There
The South Lomei Labyrinth, also known as the Desert Labyrinth, is located in the Wastelands. There are several ways to get to it, so tasks or quests you’ve already completed might make a difference in how you choose to get there.
One way to get there is by fast traveling to the Wasteland Tower. If you haven’t unlocked any of the surrounding shrines, glide down from the tower and head south. The labyrinth is just a shade to the east, but if you keep moving straight south, you’ll eventually run into a valley called The Champion’s Gate. Follow the path to the east and then south and you’ll run straight into the labyrinth.
If you have unlocked some of the nearby shrines, you can fast travel to them, as they’ll get you closer than the tower will. The Suma Sahma Shrine lies directly to the east of the labyrinth. Fast travel there, head west, and you’ll eventually discover the maze.
Another option is the Korsh O’hu shrine. You can fast travel to this shrine and head southeast. Eventually, you’ll run into The Champion’s Gate. There’s also the Misae Suma Shrine to the west. Travel there and go due east. You’ll wind up on the south side of the labyrinth, so once you hit the cliffs, just follow them north until you get to the entrance.
One last option if you want to explore the desert and finish some shrines is to travel to Gerudo Town and go from there. The South Lomei Labyrinth is southeast of Gerudo Town. You’ll encounter plenty of enemies along the way, so make sure you have the weapons you need. Plus, the desert gets very hot during the day and cold at night, so be sure you’re appropriately equipped to handle such drastic changes in temperature.
Getting Through the Maze
You’ve made your way to the South Lomei Labyrinth, so now it’s time to make your way through it and snag the Barbarian Armor.

To get started, enter the labyrinth from the primary entrance, which is on the north side of the maze. If you look straight ahead, you should see stairs. Following them down will lead you to the shrine, but it’s behind a portcullis, so there’s no point in going that direction.
Instead, take a right and follow along the outer wall of the maze. You should still be on the north side. Now, take a left. You should still be on the outside of the maze but on the west outer wall.
Follow the wall until you see an opening on your left. This will be on the inner labyrinth wall. It’s the only entrance on this wall, so don’t worry if you go past it. Just backtrack and look for the opening.
Take the stairs up and then go left. As you make your way down the stairs, you’ll see some Malice on the right. If you want to, you can climb up and over it. However, you can also keep going straight, then make a right at the next opening you come to.
Go left, then turn right and cross the breezeway. Once you’re across, take a right to move past this area. You’ll run into a long hallway with Malic on the left. This forces you to go to the right, which leads to the hall opposite the area you first came across the Malice. Continue along the hall on the southeast, then you can take a right.
More Malice
Drop down from the platform, then go into the doorway on the left. Now, take a right, then follow the path until it forces you to take a left turn. You’ll see more Malice at the end of the hallway. Again, you can move around it by climbing the walls if you want to go that route. Or you can take the safer route and take a left before you get to the Malice. This will take you into the inner part of the labyrinth.
Turn to the right immediately, then take another right. Head up a short flight of stairs, then take a left. You’ll run into another small set of steps. Go up, then back down. When you can’t go any further, take a right and you’ll find yourself in a long hallway.
Next, you’ll take a left. You’re almost there. In front of you should be a long stairway with two light posts situated at the top. Head up the stairs, then drop down past the lights. Keep going down the hallway until you can’t go any further, then take a left.
Down that hallway, you’ll see more of Ganon’s Malice blocking the way. It’s pretty high up on the walls, so you might not have enough stamina to climb past it. Take a left at the opening that’s just in front of the Malice.
Make your way up the staircase in front of you, then get across the hole. Now, take a right, then head down the stairs. Take another right once you reach the bottom. At this point, you’re forced to go to the left. Do it.
You’ll see an opening on your right. Go through, then look to your right. You’ll see the Malice you were avoiding earlier. Head to the left and continue down the corridor. (If you were able to climb over the Malice, this is where you would pick up.)
Once you reach the end of the hallway, you’ll see more Malice. Ignore it. Look for an opening on the right and take it. Now, take a left and behold! You’ve done it! The Dila Maag shrine sits before your very eyes.
Dila Maag Shrine

Now that you’ve made your way to the shrine, the only thing left to do is head in and claim your Barbarian Armor. There are no more enemies to clear, so open the treasure chest, get the armor, then head to the monk. He’ll refill your hearts and give you a spirit orb. Check another shrine off your list!
Additional Treasures
With the shrine cleared, you can explore the labyrinth and find all sorts of additional treasures located within its walls. For example, there are chests containing a Golden Bow, a Golden Claymore, a Gerudo Scimitar, and a Gerudo Shield. There are also a few chests containing Rupees. One is a Silver Rupee, worth 100 Rupees and another is a Gold Rupee, worth 300 Rupees!
FAQs
There is plenty to know about Breath of the Wild and the South Lomei Labyrinth. Here are some frequently asked questions to help you on your journey.
Question: How Many Labyrinths are There in Breath of the Wild?
Answer: There are three different Lomei Labyrinths spread across Hyrule in Breath of the Wild. These Labyrinths are unique puzzles that Link must navigate through to reach the shrines contained therein. These shrines each offer one piece of the Barbarian Armor: the Helm, the Armor, and the Leg Wraps.
Question: Where is the South Lomei Labyrinth Located in Breath of the Wild?
Answer: You’ll find the labyrinth in the southeast of the Gerudo Desert, south of the Wasteland Tower. Located at the center of the labyrinth is the Dila Maag shrine, which upon completion, rewards Link with the Barbarian Armor.
Question: Where can you Find the Lomei Labyrinths in Breath of the Wild?
Answer: The three Lomei Labyrinths in Breath of the Wild are located in three different regions in Hyrule. The Lomei Labyrinth Island is in the Akkala Region, the North Lomei Labyrinth is in the Hebra Region, and the South Lomei Labyrinth is in the Gerudo Desert Region.
Question: Can you Stack the Barbarian Armor With Food Bonuses?
Answer: Yes. If you each certain types of foods that give you attack bonuses, the Barbarian Armor will provide additional strength. However, keep in mind that the total attack power will not exceed a 3-attack bonus. Of course, once you have all three pieces of the Barbarian Armor and upgrade them, you’ll have greater attack bonuses, along with a charge attack.
Question: How Many Shrines are in Breath of the Wild?
Answer: If you’re playing the “out of the box” version of Breath of the Wild, there are 120 shrines scattered throughout Hyrule. However, if you play the DLC version, there are 16 additional shrines for a total of 136.
Power Up!

Once you’ve cleared all three of the Lomei shrines spread throughout Hyrule, you’ll have the complete Barbarian Armor set. With this set, Link is stronger and more powerful when fighting enemies. Plus, this armor set is upgradeable, increasing Link’s attack even more.
As you can see, it’s not impossible to clear the South Lomei Labyrinth, but it definitely helps to know where you’re going and what to expect. Without guidance, it would take much longer to make your way to the shrine. Hopefully, our guide gave you the information and confidence to clear the labyrinth and keep exploring Hyrule!
If you find this guide helpful, you might be interested in readings these guides below:
North Lomei Labyrinth Guide: What You Need to Know
Lomei Labyrinth Island Guide: The Legend of Zelda