
- Golden Bugs Guide: Catch them All to Be the Belle of the Bug Ball - August 11, 2022
- Kaepora Gaebora Guide - June 11, 2022
- Darknut Guide - June 8, 2022
The Legend of Zelda: Breath of the Wild, or BOTW as it’s affectionately called, has plenty of exciting new and challenging puzzles. There’s Eventide Island where you have to complete the tasks without the use of the weapons you already have. Or trying to make your way to Zora’s Domain through the lightning and rain.
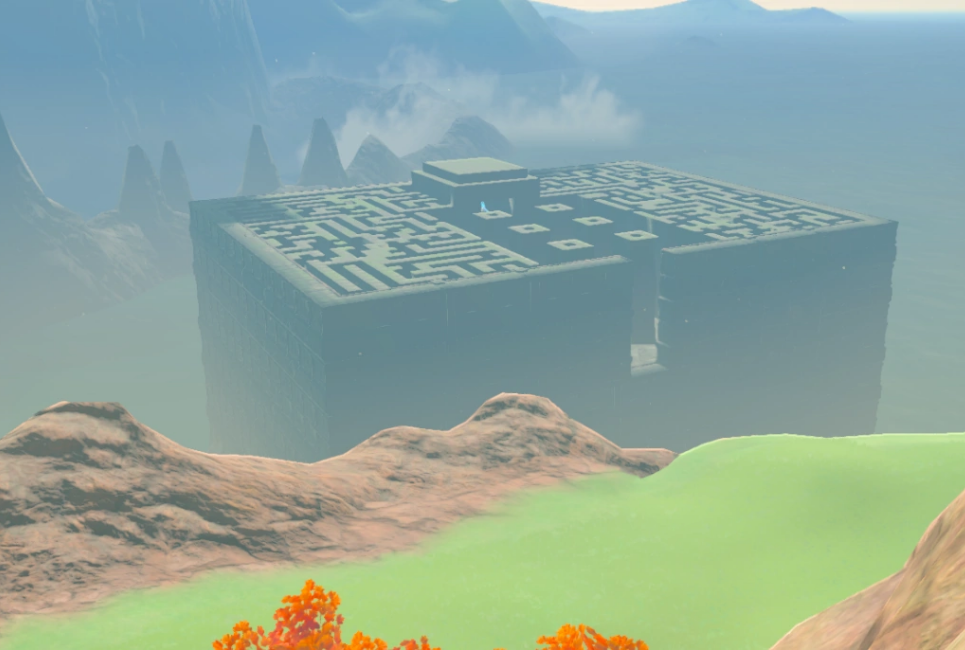
Even more challenging are the three labyrinths scattered throughout Hyrule. The Lomei Labyrinths are located in different remote places across the map. But how do you find them? And once you find them, how do you navigate your way through them?
Lucky for you, we’re going to tell you all about them. We’ll start with the Lomei Labyrinth Island.
Want to learn more? Keep reading!
Key Details Up Front
Lomei Labyrinth Island is a challenging maze that offers plenty of treasure and rewards. Within the labyrinth is the Tu Ka’loh Shrine, which gives Link the Barbarian Helm, one piece of the Barbarian Armor that gives Link strength as he fights off the enemy.
Getting to Lomei Labyrinth Island

If you’re playing through Breath of the Wild following the storyline then you’ll be able to complete the Lomei Labyrinth after you visit the Akkala Ancient Tech Lab. Lomei Labyrinth is located in the uppermost northeast corner of Hyrule. Open your map, find the Akkala Ancient Tech Lab, then look up and to the right to find the labyrinth.
Located within the labyrinth is the Tu Ka’loh Shrine. The labyrinth itself is very distinctive, sitting just off the Akkala shore. It’s essentially impossible to miss it. While it may look intimidating from the outside, once you know where you’re going and what you’re looking for, it’s not that bad.
From the Akkala coast, jump off the cliff and open up your glider. You should be able to make it without using all your stamina since the journey isn’t that far. However, the way you float over to the island will make a difference. There are two different routes you can take to complete the Lomei Labyrinth Island – the simple route or the very simple route.
Once you’ve made your way into the entrance of the labyrinth, you’ll see the shrine behind a portcullis. That’s where you want to go. You can fight your way through the maze to get to it, or you can cheat a little by busting out Revali’s Gale if you have it.
Navigating the Labyrinth

For our guide, we’re going to tell you how to navigate the labyrinth without flying up to the outer rim. This is primarily because if you are following the storyline, you haven’t received Revali’s Gale yet. That means we have to find our way through the maze. Fortunately, it’s not too complicated, especially if you know where to go. We do, so we’ll tell you.
The first thing you’ll want to do is dispatch the guardian directly in front of you. If you don’t have any ancient arrows or an ancient shield, head back to the Akkala Ancient Tech Lab and load up. Once you eliminate the guardian, run to the wall straight in front of you, then hang a left.
Again go as far as you can go, then take a right. Run down the corridor, then use Magnesis to move the metal box out of your way. Follow the path to the right, then continue straight. Take two more rights, three lefts, two rights, two lefts, followed by four lefts. The path should be straightforward.
Eventually, you should wind up in front of a ladder with two lights next to it. There’s nothing too exciting on the way to getting to this point. However, once you unlock the shrine (it’s just ahead), you can always warp back and explore the rest of the maze. There are plenty of weapons and other goodies hidden throughout the labyrinth. For now, climb up the ladder.
There are stairs straight ahead, but if you look to your right as your startup, you’ll see a little alcove with brambles. Light them up using a fire arrow and wait for them to burn. Once they do, climb up the wall. At the end of the path, you’ll discover a Great Flambeblade. This is an excellent weapon for fire damage.
If you’re up in the Hebra Mountain area and want to quickly dispatch difficult enemies, use your Great Flameblade. Just remember that it’s a two-handed weapon, so you won’t be able to use a shield while it’s equipped.
Head back the way you came and follow the stairs around to the shrine. You’ll run into a few Keese along the path. Take care of them, then move on to the shrine.
Once you’re inside the shrine, the only thing you have to do is open the treasure chest. There are no other enemies or challenges to clear. Inside the treasure chest is the Barbarian Helm, which is part of the Barbarian Armor set. Get your orb and cross another shrine off your list!
Diamond Circlet and Fast Travel Medallion
There are plenty of additional treasures located throughout the Lomei Labyrinth Island. However, there are two specific treasures you may want to take a moment and acquire while you’re there.
Diamond Circlet

The Diamond Circlet is a piece of armor that goes on Link’s head. This armor provides Link additional protection from Guardians, so it’s particularly nice to have if you’re in an area where they are present. To get the diamond circlet, find the gust of wind outside the Tu Ka’loh Shrine and drop down the hole.
You’ll land in a large room filled with guardians. Some are active while some are not. You won’t know which ones are which until you start moving around. Avoid their shots, kill them Ancient Arrows, or deflect their lasers back at them with your Ancient Shield. No matter how you do it, navigate across the room until you find a treasure chest. Inside is the diamond circlet. Enjoy!
Fast Travel Medallion

One of the coolest new additions to Breath of the Wild is a Fast Travel Medallion. With this medallion, Link can create a customized travel point. Unfortunately, you’ll have to purchase the additional Master Trials DLC to have access to the travel medallion.
It’s found through the” Ex Teleportation Rumors” quest. If you’ve already completed the Lomei Labyrinth Island quest, you’ll have no trouble getting the Fast Travel Medallion.
The only fast travel places in Breath of the Wild are shrines or towers that have already been activated. As a result, it can be tough to get to certain places, especially if there are large areas between travel points. Additionally, having a travel medallion can make certain quests much, much easier.
Where to Start

To kick off the medallion quest, you need to travel to the South Akkala Stable, which isn’t too far from the Akkala Ancient Tech Lab. Once you’re there, you’ll need to go into the stable and find the book sitting on the table. Read the book and it will tell you about the Travel Medallion. Now, head to the Lomei Labyrinth Island.
Just as you did with the Diamond Circlet, drop down into the hole near the shrine. Again, you’re surrounded by guardians, so be careful as you move throughout the room. The medallion is located directly behind where Link dropped down. Find the chest with the torches nearby and look beyond it.
When Link opens the chest, the surrounding guardians will activate. You’ve got a few choices at this point. Stay and fight, run for the updraft, or fast travel out of there. Of course, the easiest choice is to fast travel, but if you want to prove your mettle, you can stay and dispatch of those pesky guardians.
Fast Traveling
The nice thing about the Fast Travel Medallion is that you can use it anywhere Link can go. There are no restrictions to where it can be used. Just place the medallion where you want the travel point to be and it will stay there until you use the medallion again. However, keep in mind that you can only create one active travel point at a time. You can’t create multiple points.
Additional Loot in the Lomei Labyrinth Island
There are more items available to Link in the Lomei Labyrinth Island than the few we’ve already mentioned. Here’s a quick list of some of the additional loot Link will come across if you decide to explore the labyrinth further:

- Ancient Core: Located in a treasure chest near the exterior west wall.
- Ancient Shaft: Located south of the decayed guardian.
- Bomb Arrows: Located in the center-east pillar of the main courtyard.
- Gian Ancient Core: Located in a chest beyond the metal crate on the west side of the central building.
- Knight’s Bow: Located – Located in the northwest corner of the maze.
- Knight’s Broadsword: Accessible from the east entrance located in the main building.
- Knight’s Halberd: Located in the northeast corner of the maze.
- Knight’s Shield: Accessible from the east entrance located in the main building.
- Royal Broadsword: Located in the chest east of the main building.
- Sapphire: Located near the decayed guardian.
- Silver Rupee: Accessible from the north in the main building and in a chest in the middle pillar of the courtyard on the west side
- Soldier’s Bow: Located at the end of the north corridor.
- Soldier’s Shield: Located at the end of the north corridor.
- Soldier’s Spear: Located in the northeast corner of the labyrinth.
- Thunderstorm Rod: Located at the end of the north corridor beyond the decayed guardian.
FAQs
If you want to learn more about the Lomei Labyrinth Island, check out some of these frequently asked questions:
Question: How Many Guardians are There in the Lomei Labyrinth Island?
Answer: There are a total of six guardians in the Lomei Labyrinth Island.
Question: Do I Need to Defeat all of the Guardians to get the Fast Travel Medallion?
Answer: No, you don’t have to defeat all of the guardians. It’s impossible to do so.
Question: How do I get the Royal Broadsword?
Answer: The Royal Broadsword is located in a chest east of the main building in the Lomei Labyrinth Island.
Question: How Many Travel Points can I Create With the Fast Travel Medallion?
Answer: You can only have one active travel point at a time.
Question: What are the Rewards for Defeating all the Guardians in the Lomei Labyrinth Island?
Answer: While there are no specific rewards for defeating all the guardians, you’ll find a Knight’s Bow, Broadsword, Shield, and Spear scattered throughout the labyrinth, along with plenty of other loot.
Question: How do I get the Thunderstorm Rod?
Answer: The Thunderstorm Rod is located at the end of the north corridor beyond the decayed guardian.
Barbarian Helm, Diamond Circlet, and Fast Travel Medallion, Oh My!
The Lomei Labyrinth Island is home to plenty of treasures. The Fast Travel Medallion alone is worth the effort to solve the maze. With it, you can quickly travel between certain points throughout Hyrule. Of course, getting part of the Barbarian Armor Set, activating another shrine, and finding a Diamond Circlet aren’t too shabby either.
Overall, it’s a challenging part of the Legend of Zelda: Breath of the Wild. Once you’ve conquered the Lomei Labyrinth Island, don’t forget to check out the other two labyrinths as well: the North Lomei Labyrinth and the South Lomei Labyrinth. You’ll be glad you did!
Learn more about The Legend of Zelda series by readings these guides below:
Zelda Bosses Guide – Everything You Need to Know
Zelda Objects Guide – Must-Know for The Legend of Zelda Enthusiasts